"Blessed be the God and Father of our Lord Jesus Christ, who has blessed us with every spiritual blessing in the heavenly places in Christ, just as He chose us in Him before the foundation of the world, that we would be holy and blameless before Him. In love He predestined us to adoption as sons through Jesus Christ to Himself, according to the kind intention of His will, to the praise of the glory of His grace, which He freely bestowed on us in the Beloved." Ephesians 1:3-6
Showing posts with label Quiet book. Show all posts

Friday, August 22, 2014

Made: More Quiet Book Pages

More pages added to the quiet book!
 
I'm thankful for a friend sharing her quiet book with me for more ideas! There were some I had not thought of and they were nice and easy to copy:)  Thanks Kristin!
 
Chalk Board Page:
I bought chalkboard fabric (which was much cheaper than I expected!) and cut it to fit the page as I wanted.  I actually made three of these pages so all the kids could draw at the same time.  I put a little hot glue down to secure the fabric then I did use my sewing machine to straight stitch on the edge. To finish it I cut felt and hot glued that down to make a nice looking border.  The pocket is just a piece of felt to hold the chalk and a loose piece of felt to use as an eraser.  It works really well!
 
 
House of Shapes:

The house and tree trunk are glued down.  The other pieces have Velcro and an outline on the page so the child can match the shapes and complete the picture.  The only thing I didn't trace was the cloud.  Raelynn has enjoyed putting the cloud in different places on the picture.


Zipper Page:
I bought the cheapest zippers they had at the store.  So they aren't pretty colors, but the others didn't fit on the page.  I used the sewing machine for this one, as I figured with tugging toddler fingers that would be the best way for it to hold up over time.


Painting Page:
 
I didn't know if this would really interest the kids.  It's supposed to be a pretend paint, but if they can't see a picture being made I didn't think it would be super fun.  So to add a little extra to it, I just cut two pieces of each color.  I hot glued one down to the pallet and the other I added Velcro to.  So it turned this page into a color matching activity as well as the pretend painting! 


To secure the paint brush, I cut two strips of white felt and hot glued down.


Cookie Counting Page:
I love this one!! There are different amounts of sprinkles on each cookie.  There are numbers on each circle on the cookie sheet.  The child counts the sprinkles and matches to the number on the cookie sheet.  This is also a page that a child who doesn't know how to count or know the numbers can still do by just matching the cookies into the circles.

Monday, July 28, 2014

Made: Quiet Book

I added three more pages to the quiet book!

I love the way it is coming together.  SO incredibly easy!!

I have put them in a binder.  Only problem with that is the pages are a little bigger than what a piece of paper would be so it doesn't fit perfect.  I also will have to change to a bigger binder (this one is only a one inch binder) as I add more pages. 


Lacing Page:
 
I cut two rectangles and cut little slits along one side.  Used hot glue to secure on one side and used a lace from another lacing toy we had.
Add caption
Flower Page:

This is an idea I found online.  I pretty much copied it exact.  I eye-balled it and drew my own outline for the flower.  Glued numbers to each petal and then traced around each petal so there is an outline on the white page.

I cut a little curve in the bottom of each petal to help fit around the circle nice and tight.  The pink pot at the bottom is hot glued all around the sides and bottom edges, but the top is open so the petals can go inside.  I later added Velcro to the back of the petals.  The nice thing about this is it doesn't have to go in numerical order for it to still be a fun quiet activity, but it will help the learning of that!


Build an Ice Cream Cone:

I have seen this idea for pages before, so this was a copied one too.  Again, I just eye balled the cone and scoops of ice cream.  Cut, glued, and added Velcro. 
Later, I plan to add numbers to the scoops so they will go in order.  Or I was thinking even little dots so the kids will count the dots and put them in order that way.  But they aren't ready for that yet!

Sunday, June 22, 2014

Made: Quiet Book

I have had a quiet book on my to-do and to-make list for three years now-since raelynn was born! Then I realized she really wasn't into those kinds of activities so I wasn't ready to put in the effort yet.  Then Declan came along and is totally the type that likes the quiet book type of stuff and raelynn is to the age where she does too. We had a five hour car ride to California and have an airplane ride to michigan coming up, so I thought it was the perfect time to start! 

Here is what I have so far. This is a NO SEW quiet book!! (Ok, I did sew something, but you could totally use marker or pen instead. Or just do shapes instead of the balloons)

I was a little overwhelmed at the idea of cuttings felt into letters and numbers, but I knew I wanted to have those in the book. So finding these at Wal-Mart is really what motivated me to get started on this!
I think these letters is what makes it look neat and a clean finish. 
I used full white sheets of felt for the pages. I plan to put them in a three ring hard bound notebook. This is what works for our family because we have multiple toddlers who will want access to the book and this way when we are using it, the pages pop right out and in.  I decided to use one page per sheet and not put anything on the backside.


Counting Beads Page:

I glued the numbers on, counted out beads from my stash, glued one side of the ribbon down, strung on the beads, then sealed it with glue on the other side.


Ladybug Button Page:
After cutting out my pieces, I hand stitched the black buttons to the big peice of red. 
Next I glued the big red piece down on the white page, along with the legs and head. I later added eyes and the word "buttons" at the top.

I lined up the wing pieces and cut slits to match buttons. I glued the wings on--the right side is MUCH better than the left! I wasn't thinking ahead and I glued too much of the wing on the left side. It works fine, but is a tad harder to do.
All buttoned up:

Shape Puzzle Page:

Cut shapes from my felt scraps and added Velcro. The rough side of Velcro sticks to felt, so I didn't add the soft side at all.
I just traced the shape with a pen.

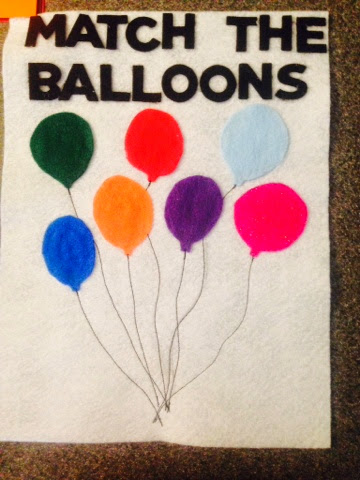
Balloon Color Match Page: (used sewing machine)

I cut out balloon shapes in a variety of colors. Cut out circles to match. Lined up carefully so it wouldn't interfere with the binder ring.


After deciding on my layout I glued top row of balloons down then straight stitched the strings with my sewing machine. This could be done with a pen, marker, or hand stitching. Or just alter this page to be circles only and no string needed!
Then I glued down my next row of balloons and continued...
I continued this until all my balloons were glued down and strings were sewn on.

I added the rough side only of the Velcro to the circle pieces so the kids can match the circles into the same colored balloon.


I'm hoping to get more pages done soon! For these I just did a quick search on Pinterest and altered what I found. I didn't copy any exactly the same, but made it to fit our needs and an easy new sew book.
I will post more photos as I get the pages completed, but I know some of you may want to make one so I didn't want to wait until I was done--because who knows how long it will take! 
The nice thing about the three ring binder is I can always be adding more as I have time.

So far the book has been a hit!! They like all the pages and even ask to play with it. I'm keeping it put away until our flight in August, then I plan to use it only at church! If it's only available to them at special times I think it will keep their interest better:)

If you have come across any no sew quiet book ideas, please link it in the comments or just explain it! I have a couple more ideas to do but would love some more:-)

I would suggest getting fabric scissors to cut. It gives the felt a nice clean edge.